My Brother's AR 15 was built from a Daytona Tactical kit and they are OK. No real gripe about the quality of parts or anything, but at the range the supplied upper receiver was sent assembled and I noticed accuracy issues. One thing led to another and I disassembled to see what was going on.
What I noticed after the barrel nut was loosened was the excessive amount of play between the barrel extension and the receiver. Any amount of play in this area can lead to accuracy issues as well as the face of the receiver if it is not flush and true when mating barrel to the upper receiver.
This rifle was very light and had the best muzzle brake on the market yet was shooting horrible groups at the range at 100 yards. Very wide.
Now there are many ways of fixing play like this. I have seen people use aircraft grade epoxy on the barrel extension then lathe it down to perfect fit. I have also seen people use 609 Loctite and also 620 Loctite, but in the event where if we decided to change the barrel down the road that would seem difficult to release. What I decided to do was go the old school way of doing things and that is by shimming the barrel. Many competition shooters from the past used this method when M16's were used in shooting competitions in the Army. To achieve accuracy everything must be a snug fit. Any play between barrel and receiver can cause accuracy issues.
But before shimming you need to verify trueness of the face of the receiver to the barrel extension.
Some receivers need lapping.
Breaking it down.
Using 220 grit lapping compound I lapped it by hand.
Shimming the barrel fitment with an aluminum can Shim.
Now the barrel has a perfect fit, nice and snug.
Wide spread before. Mind you this this with Winchester 5.56 before.
and this is after.
1.5 - 2 inch group at 100 yards with non match cheap Winchester bulk ammo. It will be better with it not being 90 degrees and having Match grade ammo.
Other improvements to the rifle came from Nictaylor00 Adjustable Trigger kit
Best investment you'll ever have for under 20.00
Trigger Improvement Spring installation for milspec triggers. No need to spend 200.00 to compete.
This kit takes the draw out of the trigger.
Expanding to another level and improving accuracy even more using an adjustable gas block.
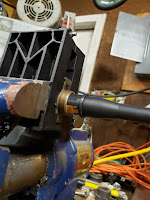
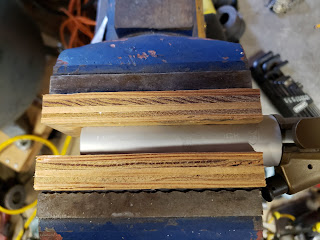
When installing the Adjustable gas block you will need to remove the free float rail handguard. You will also need to remove the original gas block. If you can't find soft jaws or non-mar jaws for your vice here is an easy way to make some. Magnetic tape can be purchased at Walmart although I don't support Walmart as they have partnered with anti gun organizations and are clearing their inventory of ammunition. If you have some scrap plywood your set. Cut the plywood scrap to width of your vice jaws and attach the magnetic strip.
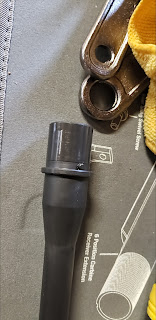
Sometimes the Crunch washer deforms in an unfavorable way that causes it to not want to slide off. This is where you apply oil to he threads and use a vice gripe to slowly cut threads into the crunch washer. The crunch washer is made of a softer material and will not damage the treads of the barrel. Take your time and slowly work it off.
As you can see the barrel threads cut threads into the washer
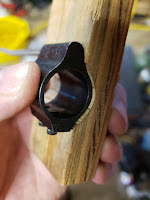
Original Gas block removed.
This is a comparison between the Seekins Adjustable and the original Micro Gas block.
Notice the gas passage and the set screw going through it. This is what our will be doing to change gas pressure coming through the gas tube. Closing the whole will allow for less recoil. Proper adjustment of pressure is when you find the sweet spot of just having enough pressure to cycle the action no more excess pressure.
To separate the gas tube you need to drive out the roll pin. Here I will make make block to support the gas block out of scrap plywood. Us the old gas block to trace material out you want to remove.
Use a Dremel and a sanding wheel bit to remove material.
Find the hole and drill to have a pin catch.
Use tape to make a depth gauge for your drill bit.
after pin is removed install gas tube into the Seekins adjustable gas block
Install the gas block and tube back onto the barrel use blue Loctite on the set screws to anchor to barrel torque to 25 inch lbs.
Install the Muzzle brake with a new crunch washer. torque till 20 ft lbs then index it from there. Be sure to use a drop of blue Loctite. Leaving the free float rail off go to the range and adjust the gas pressure to desired state. Once you found the sweet stop set the set screw to lock it in and reassemble rifle's free float rail.
AR 15 without the rail looks like something from Star Wars. lol
Tuning at the range. The goal is to reduce gas pressure to the minimum amount required to not only cycle the action, but also lock back the bolt on an empty mag.
These are tuning shots free hand unsupported standing and shooting at target 30 ft away at Gander Outdoor's indoor range. When tuning find the slowest moving ammo you can find. I Used Hornady Black 223 62 gr to tune 3100 ft per sec. Then test other brands to verify function. Using a slower round will ensure reliability for more common off the shelf rounds that shoot hotter and faster.
After dialing everything in reassemble rail torque to 24 inch lbs and use blue Loctite
Bro gets his rifle back before Christmas.
God Bless America and never comply with forced gun registration or Red Flag Laws. Those are the tactics used by Nazis to disarm Germany before WWII kicked off.
Gun Registration leads to Gun Confiscation.


No comments:
Post a Comment